"Stage One" and Second Orbit" Mantel Clocks
When I finally finished my tour of duty in the college system, my first goal as a craftsperson was to get on a track that I wouldn't easily fall off of. That meant concentrating on smaller pieces that I could sell at craft shows and in galleries. They would be easier to focus on mainly because of their scale; concise with dead-on accuracy and not needing a bigger studio space yet. (I actually wrote my thesis in 3rd year at Sheridan on this concept of starting off small to ensure that skills would be honed while likely being overwhelmed by the need to make rent as a creative person.)
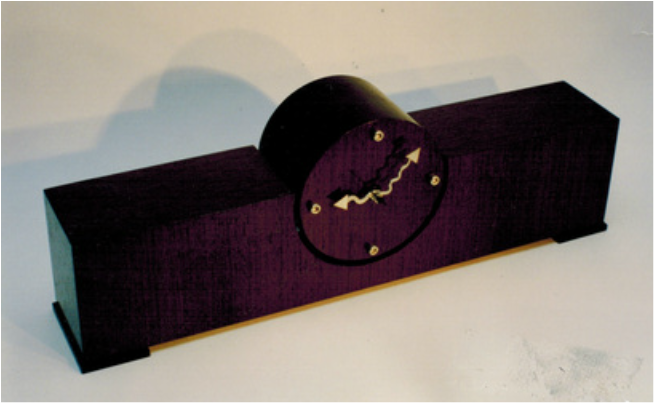
The first mantel clock (“stage one”) was developed as I recognized that I could do wonders with rock solid jigs, sharp router bits and a design hammered out into a template to make limited production runs. This one is veneered with wenge, the four number markers are nickel plated cap screws, and the hands are made by carefully (!) heating aluminum welding rod to make it flexible enough to bend fluidly without it turning to sudden white powder. The triangular hands are glazier points, which are supposed to be used for setting glass into frames. Making these wiggly parts to a consistent level of quality gave me added respect for the jewelers I knew, and still does.
Eventually, as I knew the exact wiggle I wanted in the arms, and realized that "exact" didn't come with my one-off "pliers and torch technique", I decided to bend my head around a mantel clock design one more time.
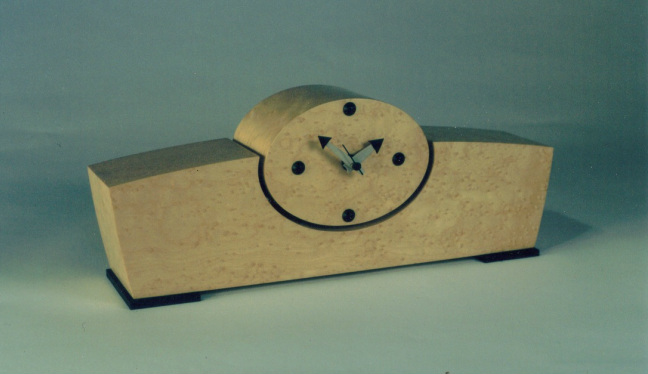
"Second Orbit" was the natural progression as I was bringing in more calculated curves to my work. The center piece is again a suspended element with perfect spacing from the body. (This concept was first played with in "Liquor Cabinet 1".) This time the feet are not painted with flat black bumper paint; they're solid ebony, the real deal. The markers are painted aluminum rivets, which are likely obsolete except for my small stock pile. (Could be a problem in the future.) The hands this time around are cast sterling silver; I spent the time to design exactly the shape and had a mold made. The arms are sand blasted and the hands are again painted with my favourite bumper paint from "the inverted red triangle store".... (Canadian Tire.)
My appreciation for the work of a fine jeweler was played out in every detail; the veneer seams are asking for a magnifying glass, the small slot screws on the back plate all point the same way. Ya.
I think the only thing that stops me from doing a small run (3-5) of these, is knowing that I'll be intensely concentrating on such small pieces in a small localized area of my studio while the rest of the space screams at me to use it to make something bigger. Hmm.... but once again, bigger is not better, while less is not more...no, Better is Better. So..... hmm... Anybody need a beautiful wedding present? (It really is a great wedding present, I've done a few and they were accepted quite graciously.)
$400 ea., in any veneer available on the planet. Call for scheduling, please do, I would like that.
The first mantel clock (“stage one”) was developed as I recognized that I could do wonders with rock solid jigs, sharp router bits and a design hammered out into a template to make limited production runs. This one is veneered with wenge, the four number markers are nickel plated cap screws, and the hands are made by carefully (!) heating aluminum welding rod to make it flexible enough to bend fluidly without it turning to sudden white powder. The triangular hands are glazier points, which are supposed to be used for setting glass into frames. Making these wiggly parts to a consistent level of quality gave me added respect for the jewelers I knew, and still does.
Eventually, as I knew the exact wiggle I wanted in the arms, and realized that "exact" didn't come with my one-off "pliers and torch technique", I decided to bend my head around a mantel clock design one more time.
"Second Orbit" was the natural progression as I was bringing in more calculated curves to my work. The center piece is again a suspended element with perfect spacing from the body. (This concept was first played with in "Liquor Cabinet 1".) This time the feet are not painted with flat black bumper paint; they're solid ebony, the real deal. The markers are painted aluminum rivets, which are likely obsolete except for my small stock pile. (Could be a problem in the future.) The hands this time around are cast sterling silver; I spent the time to design exactly the shape and had a mold made. The arms are sand blasted and the hands are again painted with my favourite bumper paint from "the inverted red triangle store".... (Canadian Tire.)
My appreciation for the work of a fine jeweler was played out in every detail; the veneer seams are asking for a magnifying glass, the small slot screws on the back plate all point the same way. Ya.
I think the only thing that stops me from doing a small run (3-5) of these, is knowing that I'll be intensely concentrating on such small pieces in a small localized area of my studio while the rest of the space screams at me to use it to make something bigger. Hmm.... but once again, bigger is not better, while less is not more...no, Better is Better. So..... hmm... Anybody need a beautiful wedding present? (It really is a great wedding present, I've done a few and they were accepted quite graciously.)
$400 ea., in any veneer available on the planet. Call for scheduling, please do, I would like that.
